Last Updated on July 16, 2022
You’re in the right spot if you need to change the drill bit in your Makita cordless. In this article, you’ll learn how to change the drill bit with a chuck, torque wrench, or a battery cartridge.
Follow these simple steps and you’ll be ready to use your new tool right away. Read on to learn how to change the drill bit on your cordless tool in no time!
Changing the drill bit on a makita cordless drill
Changing the drill bit on a Makilta cordless drilling tool is simple. Just follow the steps outlined below. You should use a new drill bit if the old one is too damaged.
It may have changed color because it was overheated. To place the new bit in the chuck, position the smooth end of the drill bit in the chuck jaws. Tighten the chuck jaws and hold the drill bit in place. Be careful because the drill bit may slip out when you try to tighten them.
The first step is to lock the chuck. When this is done, push the direction selector near the trigger to the right. When in counterclockwise mode, the trigger will be released.
Once the trigger is released, you can begin to loosen the chuck with the motor. Make sure that the trigger is pointing upward to prevent the bit from falling out. Repeat these steps for the other drill bit.
Changing the drill bit on a Makilta cordless drill is easy if you know how to use the tool. When a drill has a chuck, the chuck will open and close the jaws.
A direction selector located above the trigger will control the speed and flow of energy to the motor. A keyless chuck makes changing the drill bit much easier than on a traditional corded drill.
When changing the drill bit on a Makilta cordless drill, you need to ensure that the battery is fully charged. Before you can change the drill bit, you need to unhook the tool from the wall. You can also remove the battery cartridge from the tool.
Once it is unplugged, you must take the battery cartridge with you to a Makilta Authorized Service Center or distributor. The battery should also be removed and disposed of properly to avoid any potential damage.
Changing the drill bit on a Makilti 18v is easy, but you must be careful to avoid excessive pressure as it will damage the bit tip and reduce the tool’s performance.
Too much pressure will also damage the bit and shorten its life span. When the drill bit gets stuck, you can try to remove it by setting the reversing switch to reverse rotation. But be careful, because the drill bit may back out abruptly if you do not hold it firmly.
Using a chuck to change the drill bit
Using a chuck to change the motor on a Makita cordless jigsaw can be a simple process but can be tricky for inexperienced users. You should know the proper technique to use it, as there are a few steps you should follow before you can change the drill bit.
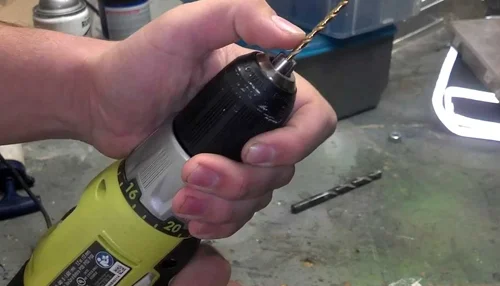
First, choose the correct size drill bit for the job. Once you’ve decided on the right size of drill bit, simply insert it into the chuck.
To change the drill bit on your Makita cordless drill, reverse the way you installed the bit. First, open the chuck with your hand, then insert the new bit.
Next, hold the drill in the forward position and press the trigger. Then, tighten the jaws to make sure the drill bit stays in place. This step will prevent the drill from slipping out of the chuck.
Using a chuck to change the motor on a Makita cordless drill is easy to follow. Before using your drill, you need to close the jaws so the bit can be inserted easily. Alternatively, you can also use a keyed chuck, which clamps down the bit. Unlike cordless drills, a keyed chuck requires a wrench.
When using a Makita tool, you must make sure that you use the right type of chuck for it. The torque numbers on a drill represent the amount of torque it can apply.
Usually, the range is from one to twenty, with one representing the least amount of torque while twenty represents the most torque. However, it depends on the manufacturer. The torque adjustment ring is usually located near the drill bit. If you don’t have two hands, you should use a wrench to tighten it.
Using a torque wrench to change the drill bit
To change the drill bit on a Makitia cordless tool, follow these steps. First, you need to loosen the chuck. Then, turn the wrench counterclockwise to release the bit.
Do this several times until the drill bit comes free. If the drill bit remains stuck after adjusting the torque wrench, it means you have not properly loosen the holes. If this is the case, you should use a Phillips Head screwdriver to unscrew the screws and turn the chuck.
Next, you need to check the drill’s LED light. Most drills have a switch for forward and reverse operation, which indicates the direction of the drill.
The arrows indicate the forward and reverse positions. If the LED light does not work, you can try to adjust the torque with the help of a torque wrench. Using a torque wrench to change the drill bit on a Makita cordless drill can save your time and money.
When changing the screw of a Makita cordless drill, you need to make sure you have the proper torque wrench. In general, impact wrenches do not have torque control.
Instead, they have a variable-speed feature. In this way, you can adjust the torque output for various materials and activities. Most drills have eight to 10 clutch settings. One important consideration is the weight of the drill. Too heavy a drill can be tiring for the operator, especially when working overhead.
After you have selected the torque wrench, you need to attach the tool to the battery and begin changing the drill bit. The torque wrench must be tightened securely.
If you don’t use the torque wrench properly, the drill will not work at all. If you don’t use it correctly, you will cause damage to the tool. It is recommended to change the drill bit after every six months to avoid this.
The torque wrench is an essential tool to use with your Makita cordless drill. A properly set torque setting will make the job easier to do.
Remember that high torque is difficult to handle and tiresome. Always follow manufacturer instructions to ensure you’ve chosen the correct torque setting. It is also important to check the ring for proper alignment. A loosened screw is likely to cause damage.
Using a battery cartridge to change the drill bit
Changing the drill bit on a cordless drill may be tricky, but it’s not as hard as you might think. First, open the battery housing and insert the battery cartridge.
Then, slide the battery into the drill housing all the way. If you have trouble installing the battery cartridge, follow the warnings on the battery. Failure to do so could result in a fire or excessive heat. Also, the drill could malfunction or explode if the battery is not properly installed.
The drill is now in reverse, and you can install the new bit. To change the drill bit, grip the end of the chuck with your other hand. Then, lower the new bit into the chuck.
Hold the drill in a forward position, release the trigger, and tighten it with your hand. You can use the same process to change the drill bit after you change the battery.
If you’re looking for a high-quality drill, choose a drill with lithium-ion batteries. These power sources are lighter and last longer than their older counterparts.
Lithium-ion batteries also have a higher energy density than NiCad batteries. But lithium-ion batteries also cost more. Make sure you buy one with a battery gauge to tell how much power you’ll need.
Before you start using your drill, check the battery. If you’ve purchased a new battery, you should charge it with a charger. In addition, you should never leave a cordless drill running.
Using a battery cartridge to change the drill bit on a Makita cordless drill will prevent the drill from becoming “live” if it touches the exposed metal parts of the workpiece.
Most drills come with two or three speeds. Lower speeds produce higher torque, while high-speed/low torque settings work best for drilling small holes.
Also, cordless drills with brushless motors work with magnets to spin the chuck. These magnets propel them around in order to spin the drill bit. The motor in a cordless drill is a brushless motor.
Frequently Asked Questions (FAQs)
1. How do you change the drill bit on a Makita cordless drill?
To change the drill bit on a Makita cordless drill, you will need to first remove the battery. Next, locate the chuck key on the side of the drill.
Insert the chuck key into the chuck and turn it counterclockwise to loosen the chuck. Once the chuck is loose, you can remove the old drill bit and insert a new one. Finally, tighten the chuck by turning it clockwise.
2. What is the best way to change the drill bit on a Makita cordless drill?
The best way to change the drill bit on a Makita cordless drill is to remove the battery, unscrew the chuck, insert the new bit, and screw the chuck back on.
3. How do you ensure the drill bit is properly secured on a Makita cordless drill?
To ensure the drill bit is properly secured on a Makita cordless drill, you need to first make sure the drill is turned off and unplugged. Next, you need to find the chuck key and insert it into the chuck. Once the chuck key is inserted, you can then tighten or loosen the chuck as needed.
Verdict
In order to change the drill bit on a Makita cordless drill, you will need to first remove the battery and unscrew the chuck. Once the chuck is removed, you can then insert the new drill bit and screw the chuck back on.