Last Updated on June 11, 2022
In case you were wondering how to weld angle iron corners, this post is for you. The basic steps are described in this article, and you’ll soon have the skills to make any corner on any angle iron structure stronger.
You’ll learn how to use a cutting torch, fillet weld, and welding magnet to make it happen. We’ll also take a look at some common mistakes and solutions.
Using a cutting torch
Using a cutting torch to welder angle iron corners is an excellent way to repair your welding project and achieve professional results. Before beginning a project, determine the height at which you will hold the torch. If the angle iron is too high, the cutting tip will prevent the torch from continuing its cutting action.
Once you’ve determined the right height, begin cutting. Using a cutting torch to weld angle iron corners can be a challenging and frustrating process if you don’t have experience.
Before weld angle iron corners, make sure you know how to use a cutting torch. A cutting torch is used to cut angle iron pieces to length, and it can be used to cut holes for bolting. Typical cutting torch systems consist of a tank of acetylene or propane, a pair of supply hoses, and a torch handle.
Cutting torch kits are readily available at welding supply stores and hardware stores, and they can help you get the job done properly.
Once you know how to use a cutting torch to weld angle-iron corners, you should also know how to use it for other welding jobs. If you need to weld angle-iron corners, it is best to use a gas cutting torch. These tools are relatively inexpensive and can be used to cut angle-iron corners and bolt holes.
Another great option is a welding magnet. These tools hold pieces at the right angle during welding, allowing you to use a cutting torch without the risk of burning your hands.
Using a butt weld
Welding angle iron angles requires careful preparation. Butt welds are designed to join two plates end-on-end so that they are flush across the top and bottom surfaces. However, these welds can be difficult to perform due to the fact that they lack a visual guiding line.
These angles are critical and require careful weld preparation. Listed below are tips for applying butt welds to angle iron corners.
When preparing a corner joint, you must ensure that the angles are in the same plane. The corners are often difficult to align and assemble. Single-sided welds contain oxides along the penetration bead, reducing the strength of the joint.
However, pulsed AC-TIG welding is more efficient and helps reduce creases. While it is not the best choice for welding angle iron corners, it can be an excellent choice in some cases.
Butt welds are most effective when two pieces are end-to-end and the thickness of the parent metal is the same. Because of this, butt welds usually have a gap between the workpieces, which ensures that filler metal penetrates the joint without creating distortion. The advantage of butt welding is that it is cost-effective.
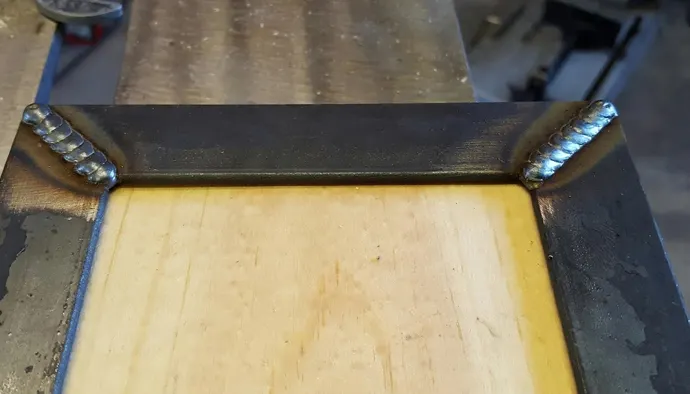
Using a fillet weld
Fillet welds are internal corner welds. They are commonly 90deg, but can be any angle less or greater. The fillet is the name for the triangle-shaped piece of metal inside the weld. This type of weld is also known as a butt weld. It is the most common type of weld for angle iron corners.
Fillet welds are often indicated with a size. The size is usually called out on the left side of the symbol, before the vertical side. This size relates to the length of each leg of the weld.
If the leg lengths are the same, a single size callout will be used, but it is not common to see the size. If the leg lengths of two pieces are different, a double-size fillet weld will be used.
When fillet welding angle iron corners, the electrode is held at a 45-degree work angle, and the gun and electrode are held five to fifteen degrees forward from the true vertical position.
The angle between the pieces is usually equal to or greater than 90deg. The length of each leg should be equal to the height of the other piece. A fillet weld is a perfect weld when it meets all of these conditions.
When welding angles, a fillet weld is the perfect choice if you need to attach angle iron corners. The weld is easy to apply, and can even be done with very little experience.
Just remember to read your drawings carefully! You should be able to tell exactly where to weld your angles with fillet welds.
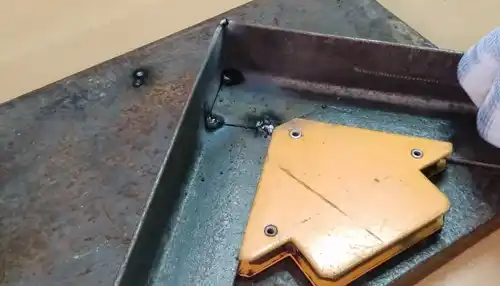
Using a welding magnet
The use of a welding magnet in the weld process is quite common nowadays. A welding magnet has a high magnetic strength, and it helps in the welding process. However, it is important to remember that magnets are not permanent and can attract metals, ruining the alignment.
Different types of welds require different types of magnets and clamps. Using only one type of magnet is enough for smaller projects, while larger projects may require the use of both types of magnets. Here are some tips to choose the right type of magnet for your project.
A switch-controlled welding magnet has an ON/OFF switch. The switch will prevent the magnet from sticking to your workbench and attracting other tools. It can also hold your workpiece at a 45-degree or 90-degree angle.
The advantages of this kind of welding magnet are numerous. This tool is easy to use and will save you a lot of time. A welding magnet will make your work more efficient and accurate.
Welding magnets that are switchable on and off are highly recommended for angle iron welding. These welding magnets are versatile and can work in a range of temperatures. For welding angle iron corners, you may want to use a V-pad-style clamp. It can hold an angle up to 90 degrees and is a good choice for small workpieces.
These clamps are used in many applications, including welding, fabricating, and assembling larger parts. They have replaceable rubber pads to reduce stray magnetic fields and hold your workpiece securely.
Creating a single-piece frame
Creating a single-piece frame from angles of angle iron corners requires that you use a tack welder and clamps to square up the angles. This method is not permanent, however, and requires some practice.
To avoid any welding errors, ensure that the corners of the frame are squared before you weld them together. Metal is prone to skew when it is heated, so measuring diagonally from one corner to the next is necessary to prevent any distortion.
Start by marking two angles of angle iron and their respective angles. This will give you a rough idea of the angles. Measure the distance between two 1 920mm sides and mark the centre of these two angles. Next, cut two lengths of flat bar. Cut one of the lengths of flat bar in the middle.
Use a drill press to mark the holes so that the frame and headboard line up. The holes should be 12mm. You will use four 90mm pieces of 12mm threaded bar to fasten the frame and headboard together. Be sure that the nuts are 12mm.
To make the table top frame, you need two pieces of angle iron, each of which will rest within another. Afterwards, you’ll need to join them by welding them together. You can use a reciprocating saw to cut these small pieces. Make sure that the edges of each piece match, as this will ensure a flush fit. Also, try to position the pieces at a 90-degree angle to keep the frame’s rectangular shape.
Creating a single-piece frame with multiple pieces of angle iron
First, square up the corner of the two angle iron pieces. Use a drill press to make sure the holes line up. Now, you can assemble the frame and headboard together.
Make sure the holes in the headboard and angle iron frame line up, and thread the bar through them. Screw on four 12mm nuts to secure the headboard to the frame. The headboard and frame should be square.
Another way to build a single-piece frame is to bend the pieces of angle iron at 90 degrees. This creates a single-piece frame that is stronger than multiple pieces of angle iron.
The angle iron should have one 90 degree bend, which reduces the likelihood of bending. When constructing a single-piece frame with multiple pieces of angle iron, make sure to use extra-long angles instead of shorter lengths.
Angle iron is an ideal material for construction because it is strong, lightweight, and inexpensive. It can be easily cut and drilled with basic power tools. However, some projects may require a welder. You can make a rustic railing on a deck, a garage shelving unit, or even a shelf with adjustable shelves with angle iron.
The possibilities are endless. If you have access to an angle iron workshop, you can create a one-piece frame using this versatile material.
Frequently Asked Questions (FAQs)
-What is the best way to weld angle iron corners?
The best way to weld angle iron corners is by using a Mig welder with the proper shielding gas.
-What are some tips for welding angle iron corners?
-Start by preparing the metal by cleaning it with a wire brush and removing any rust.
-Next, set up your welding machine and choose the right settings for the type of metal you’re working with.
-Then, position the two pieces of metal at a 90 degree angle and weld them together.
-Finally, let the weld cool before handling it.
-What are some common mistakes when welding angle iron corners?
Some common mistakes when welding angle iron corners include not getting a tight fit, not using enough heat, and not keeping the weld pool small.
-How can I avoid making mistakes when welding angle iron corners?
There are a few things you can do to avoid making mistakes when welding angle iron corners:
– Use a jig or clamp to hold the pieces in place so that they don’t move around while you’re welding.
– Take your time and weld slowly and carefully.
– Practice on some scrap pieces before you start working on your final project.
Verdict
Welding angle iron corners is not difficult, but it does require some practice to get the hang of it. There are a few different ways to weld angle iron corners, but the most common method is to use a welding torch.
If you’re new to welding, it’s a good idea to practice on some scrap metal before you try welding your angle iron corners. Once you’ve got the hang of it, welding angle iron corners is a quick and easy way to join two pieces of metal together.