Last Updated on July 23, 2022
If you’re new to using a miter saw, you may be wondering how to prevent kickback. You’ve probably heard that cutting with the lower (bottom) quadrant of a blade will minimize the risk of kickback. If so, read on to learn how to prevent kickback. Here are some tips:
Cutting with the bottom (lower) quadrant of a blade
The risk of kickback is greatest when the cutting tool is used improperly or in the wrong operating conditions. Proper safety procedures can help minimize kickback.
When using the saw, always stand on the same side of the fence as the blade, and never reach over the saw. Kickback causes the workpiece to fold into a “v” shape, propelling the saw back at you.
First, the miter saw table features a detent to hold the angle. In this way, the miter saw does not move during the cut. If it does not have a detent, the angle is held in place by tightening the saw handle.
Whether you’re working on home decor or outdoor projects, miter saw tables are essential for achieving the perfect cuts. Miter saws are also useful for crown molding and baseboard molding. Miter cuts are made on the edge of wood, changing its profile.
The top (upper) quadrant of a blade is generally the best choice for cross-cutting or ripping. The latter is more dangerous because it may cause the workpiece to come in contact with the blade.
Using a mitre gauge while cross-cutting will increase the risk of binding and kickback. Always place your workpiece against the mitre gauge and avoid freehand sawing.
The speed of the blade is important as well. If the speed of the saw is too slow, the workpiece will be kicked back. Then, the blade should be free from jamming the blade and stalling the motor.
Finally, the material must be fed at a steady rate. If the workpiece is twisted or bent, the jamming saw blade will also stall the motor.
The best way to avoid kickback is to adjust the bevel angle of the blade. If your workpiece is square to the table and 90 degrees to the blade, your miter saw will be square and avoid kickback.
If your blade is too high or too low, the workpiece may fly off the saw during the cut. To avoid this problem, use a roller stand to prevent the workpiece from being knocked off the table.
A second way to prevent kickback is to clamp down a temporary guide, such as a temporary guide, on the base of the miter saw. But you should use caution when installing clamps on miter saw bases.
The clamps can interfere with changing angles, so you should keep them out of the way. A self-tapping screw works perfectly for aluminum bases.
A miter saw’s noise emissions can vary from its declared value. The actual value may vary from its declared value, depending on how the blade is used and what the workpiece is being processed.
A properly installed blade will reduce the noise. And, as always, you should never start a project when you’re tired, hungover, or otherwise distracted.
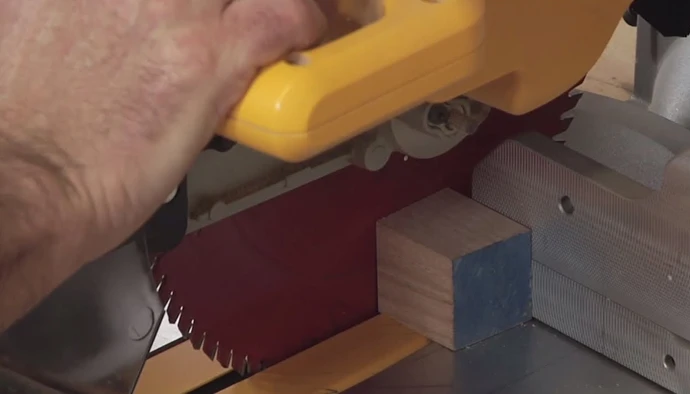
Using a stop block
A stop block is a piece of hardware that can be nailed to the fence of a miter saw. It can be permanently attached to the fence or can be temporarily fastened using double-sided tape.
It can also be used when cutting multiple pieces of the same length. To use a stop block, position the board edge against the fence so that the blade meets the board at the appropriate angle. Then, pull the trigger to the upper position and lower the handle to complete the cut.
A stop block comes in three basic styles. The clamped type is the most straightforward and does not require any fancy set-up or track. The simple clamp type works well for beginning woodworkers.
Depending on the length of your material, you can also adjust the bevel angle. For a smoother result, loosen the screws on the stop plate. Depending on the materials being cut, you may need to make two or three passes with a clamped stop block.
When using a sliding miter saw, you may want to consider using a stop block. A stop block can prevent miter saw kickback by supporting the side of the board that you’re cutting.
It’s important to note that the stop block will not support most of the board. If you don’t support the board with the stop block, it can tip the miter gauge and put your fingers too close to the blade.
A stop block is essential for preventing kickbacks. A miter gauge should be squared and not too far from the blade. If it isn’t squared, it will cause wobbling, vibrations, and kickbacks.
It also is important to keep the blade at a correct angle, as the incorrect angle will cause kickback and vibration. So, it’s important to check the angle of your saw before cutting any pieces.
A stop block helps prevent kickback by slowing the blade movement. It’s very important not to rush the process. It will be worth your effort and money.
Moreover, it will help to prevent any kickback that may occur. The best way to avoid a miter saw kickback is to choose the correct blade for the task at hand. Take the time to research the right blade before buying one.
A stop block can be a great tool to prevent miter saw kickback. When used properly, it will prevent kickback in the worst case scenario and help you gauge the length of the stock.
It’s also important to avoid clumsy clamping. A stop block will also prevent the workpiece from getting trapped between the blade and the fence. Therefore, it’s vital to use a stop block to prevent kickback to avoid potential injuries.
Using a blade guard
Using a blade guard to prevent kickback is an effective way to ensure safety when cutting wood. Often, kickback occurs when a piece of wood pinches the saw kerf or is too loose to hold on to.
A splitter can help keep boards from pinching into the kerf, and its thickness should be at least as thick as the blade’s body. A narrow kerf is more likely to grab and cause kickback.
Kickback can occur when a board is ripped or crosscut. In these situations, the blade is forced backwards by the wood, which becomes pinched between the blade and rip fence.
When this happens, the blade is propelled forward and the board flips up, striking the operator. When this happens, it is important to use a blade guard on your miter saw.
A miter saw blade can cause serious injury if it catches on your fingers. To avoid this, make sure that you wear a protective shield, and stand away from the blade when using it.
Also, wear safety glasses or a miter saw mask while working. Always use the guard and never let it go beyond the safety stop. This will ensure your safety and productivity. You can also use a blade guard to avoid kickback when working with wood.
Using a blade guard to prevent mitar saw kickback is important, especially when working with large pieces of wood. You should also think about how the workpiece will be stable.
If the workpiece is not stable, it may tilt on the back end, causing it to slip off the saw blade. If necessary, you may need to install outfeed and infeed supports on the fence.
If you are planning to make bevel cuts, you may want to remove the blade guard in order to see the cut. But most woodworkers need to see their cuts, and a blade guard can be a nuisance.
It won’t restrain the board in the event of a kickback, but it does reduce the risk. If you plan to make bevel cuts, you will probably want to remove the blade guard.
To avoid miter saw kickback, make sure that the base plate of the saw makes contact with the workpiece. Place the bowed wood with the bottom facing up, leaving no space between the two pieces.
If you use a blade guard, make sure that the blade guard extends between 1/4 to half an inch below the board. Extending the blade beyond that will increase the risk of a binding and create additional hazards. The rule of thumb when using a blade guard is to expose the blade as little as possible.
Another way to reduce miter saw kickback is to use a sled for crosscutting. A sled cradles the workpiece while it passes through the blade. After the cut, it pushes the workpiece past the saw blade.
A sled can also be used to help prevent kickback when cutting thin rip cuts. It will also be difficult to use a blade guard when using a dado stack for a non-through cut, so make sure you remove the blade guard when cutting this type of cut.
Frequently Asked Questions (FAQs)
1. What is the best way to prevent miter saw kickback?
There are a few ways to prevent miter saw kickback:
-Use a push stick or other device to keep your hands away from the blade.
-Never try to stop the blade with your hands.
-Keep the work piece firmly against the fence.
-Use a hold-down device to keep the work piece from moving.
-Be sure to use the correct blade for the material you’re cutting.
2. How can I keep my hands safe while using a miter saw?
There are a few ways to keep your hands safe while using a miter saw. First, you can use a push stick to help push the material through the blade. This will help keep your hands away from the blade.
Second, you can use a miter saw guard. This will help keep your hands away from the blade and help protect you from flying debris. Finally, you can wear gloves to help protect your hands from the blade and debris.
3. What are some of the safety features on a miter saw that can help prevent kickback?
Most miter saws will have a riving knife or splitter that helps to keep the cut kerf open, and therefore prevent the workpiece from binding on the blade and being kicked back. Some miter saws also have anti-kickback pawls that will engage if the blade starts to bind, and stop the blade from spinning.
4. What should I do if I experience kickback while using a miter saw?
If you experience kickback while using a miter saw, you should immediately turn off the saw and unplug it. Then, inspect the saw to see if there is anything blocking the blade or if the blade is damaged. Once you have determined that the saw is safe to use, you can restart it and resume cutting.
Conclusion
One of the best ways to prevent miter saw kickback is to use a blade guard. Another way is to keep your hands close to the blade and never behind it. Kickback can also be prevented by using a push stick or other device to keep your hands away from the blade.